How to poach an egg

As a food lover you’re allways looking for new challenges, right? Last week I wanted to make an attempt to poach an egg. I’ve heard about it many times, seen it in movies and read “poached egg” in recipes. But what is a poached egg and how do you make it? I went to the place where I allways go when I’m in despereate need, and as allways, YouTube never disappoints. A poached egg is an egg that you boil directly in water, without the shell! Sounds quite hard to do, doesn’t it? But it isn’t! This is really the perfect way to prepare an egg if you want to impress your friends!

I find that the trick to succeed with this is that the water should not be too warm. Slightly simmering is definitely warm enough. I’m really not an expert at this, but I believe that if the water boils and you pour in your egg, it will be to much movement in the water for the egg whites to cover the yolk nicely. Also, I add in a teaspoon of white vinegar which helps the egg to coagulate the egg white.

So this is how I do it:

  • 1 egg
  • 1 teaspoon of white vinegar
  • Water
  • Salt and pepper
  1. Add quite a lot of water in a sauce pan, almost full
  2. Pour in the white vinegar
  3. Put a wooden spoon into the water and make a circular motion, so it looks lik a whirlwind
  4. Crack the egg into a small bowl and pour the egg carefully into the whirlwind in the water
  5. If the egg white doesn’t cover the yolk just yet and the whirlwind has stopped, make the circular motion again
  6. Let it cook for 4-6 minutes, depending on how loose you like your egg yolk
  7. Pick up the egg from the water and drain it

Panna Cotta with rhubarb syrup

I can’t believe it’s only one week until my summer break starts. The time flies so fast! On Sunday I will be throwing a birthday brunch, so I’m using a lot of energy on preparation stuff. I’ve already made all the foods that can be stored until Sunday, such as grissini, granola, chocolate spread etc. I’m really looking forwoard to this brunch, because I’ve never actually been to a real brunch or hosted one. Fingers crossed that everything will turn out good!

Last Saturday, I really wanted to make dessert, though I wanted to try something without chocolate for once. Yes, you read right – no chocolate! It was a bit hard to choose, but when I saw a picture of a panna cotta with rhubarb syrup I was sold. We also have a lot of rhubarb in our garden, and we better use them before they go bad. The recipe I used was very, very simple – anyone could do it really, just make sure your cream and milk don’t burn! I served this dessert to myself, my mother and her friend, and we all really enjoyed it. The panna cotta was not too sweet, but had a good taste of real vanilla and the rhubarb syrup added a interesting hint of sweet and sour. Just perfect!

I used the panna cotta recipe from the cookbook “Under the Wallnut Tree” and the recipe for the rhubarb syrup here. (Serves 3)

Panna Cotta:

  • 1 1/2 dl cream
  • 1 dl milk
  • 1 1/2 tablespoons sugar
  • 1 gelatin plate
  • 1/4 fresh vanilla bean
  1. Bring cream, milk, sugar and vanilla bean up to a boil. Place the lid on and let simmer for 15 minutes
  2. Lay the gelatin plate in cold water until soft. Add in to the liquid and stirr until it dissolves
  3. Remove the vanilla bean and scrape out the seeds. Add the beans into the mixture
  4. Let the mixture cool down a bit, and then pour into small bowls. Store in the fridge

Rhubarb syrup:

  • 160 grams of fresh rhubarb
  • 1/4 tablespoon grated ginger (I skipped this)
  • Juice of 1/2 lemon
  • 45 grams of sugar
  • 25 ml water
  1. Add the rhubarb, ginger, lemon, sugar and water in a heavy bottom pan. Cook on low heat until the rhubarb gets tender.
  2. Remove the rhubarb and keep simmer until the sauce reach a syrup consistency
  3. Let cool a little bit, and pour over the panna cottas. This is best when it’s still warm

I spread some chopped up almonds on top, to get a little crunch. Enjoy!


Chocolate Mousse

I created this recipe for a long, long time ago and I still use it. It has been a tradition for both me and my sister to serve this chocolate mousse when we throw birthday parties! The mousse is quite rich, therefore a small amount will make you satisfied. Personally I prefer to eat it plain, but it also tastes really good with whipped cream and berries.

A very interesting thing I learned a couple of moths ago: We associate chocolate mousse with this creamy and fluffy consistency with many air bubbles. However, the air bubbles are actually just an industrial trick to reduce the amount of product while it still looks like a lot.

Here is the recipe. It’s enough for 4 big portions.

  • 1 1/3 dl cream
  • 150 grams chocolate, 70%
  • 3 egg yolk
  • 2 egg whites
  • 65 grams icing sugar
  1. Whip the cream and place it in the fridge
  2. Melt the chocolate in a water bath. Add in the egg yolks
  3. Whip the egg whites and the icing sugar until it forms stiff peaks
  4. Mix the chocolate with the whipped cream and gently fold in the meringue
  5. Fill the mixture in glasses or a small bowl and keep them in the fridge

Granola

The weather is still warm and sunny here, but I’ve accepted it and dared to go outside. Now I’m kind of enjoying it… Weird. Anyway, today I have been outside all day in our garden. My mother and my uncle are making a greenhouse, which turns out to be the most beautiful greenhouse I’ve ever seen! Me on the other hand, have removed weeds from the whole garden! Boring but definitely necessary.

I’m a huge fan of yogurt, and I just love to have some granola on top. It makes the meal tastier and more filling. We bought our granola in the past, but it’s ridiculously expensive and there are always something I don’t like in there, like dried bananas. Therefore it’s more than genius to make my own custom made granola! Add what I prefer and leave out what I don’t like. Clever, huh?

Here is my favourite granola recipe:

  • 6 dl rolled oats
  • 1 dl sunflower seeds
  • 1 dl pumkin seeds
  • 1 dl dried coconut
  • 1/2 dl linseeds
  • 2 dl chopped nuts (I use almonds and hazelnuts)
  • 2 teaspoons ground cinnamon
  • 1 dl water
  • 3 tablespoons rapeseed oil
  • 1 tablespoon honey
  • 2-3 dl dried fruit (I use blueberries, cranberreis and raisins)
  • Salt
  1. Preheat the oven to 200°C
  2. Mix everything exept the liquids
  3. Whisk water, oil and honey in a glass and pour into the dry mixture. Mix until everything is damped
  4. Pour the mixture into a baking pan and spread some salt (optional). Place in the oven
  5. Take out of the oven after about 7 minutes and stir the mixture. Repeat until granolan is dry and crisp

Lemon Pie

Oh my GOD this weather is awful! Just over night it went from rainy and cozy to…warm and sunny. I can’t do anything in this weather, really. I can’t go outside because I will pass out from the sun, I can’t watch TV because the sun is too bright, but worst of all: I can’t bake because I’m too exhausted to even stand up! I thought we were kind of safe from this kind of weather here in Norway, but I guess not!

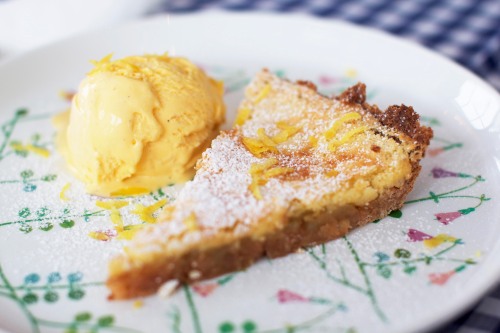
Since the sun is yellow and this pie reminds me of summer, this recipe is what I share with you today. Oh, by the way – I had English exam today at school! Don’t think it went that well, though… The theme was pretty difficult and I was all stressed because I had too little time! Anywho, back to the pie: This pie has the perfect balance between sour and sweet, and it’s very refreshing. Even though I’m a chocolate lover, this is one of my top three desserts! It tastes amazing with vanilla ice cream or even vanilla cream.

This recipe is from a Swedish chef called Anna Bergenström. My all time favourite cookbook is Under the Walnut tree and Anna has written it. I would highly recommend this book if you’re looking for a cookbook with beautiful pictures, many recipes and wonderful food. Now: The pie!

The dough:

  • 2 1/2 dl wheat flour
  • 1/2 dl sugar
  • 1 teaspoon vanilla sugar
  • 125 grams of room temperatured butter

The lemon cream:

  • 3 eggs
  • 2 dl sugar
  • 1/2 dl wheat flour
  • The zest of 1 lemon
  • 1 dl pressed lemon juice
  • Icing sugar
  1. Preheat the oven to 200°C
  2. Mix flour, sugar, vanilla sugar and butter in a food processor until it forms to a ball.
  3. With floured fingers, press the dough into a pie dish.
  4. Bake in the oven for about 15 minutes.
  5. Whisk eggs and sugar until white and fluffy and add in the flour, lemon juice and zest. Pour into the crust.
  6. Bake for 8-10 further minutes. Remember: The filling is supposed to be a bit liquid, it will set when it cools.
  7. Sprinkle som icing sugar on top so it looks pretty.

Cheese Quiche

Usually I’m not a big fan of quiche, especially if it contains leek, broccoli or green onions. It’s weird because I try to like it, but I just can’t stand the taste… However I really like plain quiches with ham and cheese, or in this case only cheese. It’s perfect as a side dish but I enjoy eating it with a green salad and a splash of mustard vinaigrette or just a bunch of fresh oregano on top.

The dough:

  • 150 grams of cold butter
  • 3 dl wheat flour
  • 1/2 dl water

The filling:

  • 300 grams of  grated cheese
  • 3 eggs
  • 1 dl milk
  • Salt and pepper
  1. Preheat the oven to 200°C
  2. Mix butter, flour and water until a smooth dough.
  3. Roll the dough out to a circle, and place it in a pie pan. Push the edges with a fork.
  4. Add in the grated cheese to the pie.
  5. Whisk together the eggs, milk, salt and pepper. Pour into the pie.
  6. Bake in the lower part of the oven for about 20 minutes, or until the pie crust is golden and the edges are crisp.

Chocolate Cake

As you know I looove chocolate (in fact I’m eating chocolate right now!) and I’ve made many different chocolate cakes during my 17 year old life. Usually I make really dark cakes with almost no sugar and just chocolate chocolate chocolate, but this cake down below is actually not that dark so it can be served to children (if they don’t like dark chocolate) as well.

This cake was served to me by my aunt when she threw a party. I was sold after the first bite! This cake has quite a heavy texture, even though it feels light. The crust is a little crispy and the center is reaaally soft, creamy and has a hint of chewyness. I like to bake mine for a couple of minutes less than the recipe says and then keep it in the fridge so the center sets. Serve the cake with fresh berries with vanilla ice cream or whipped cream.

  • 200 grams butter
  • 200 grams chocolate, 70%
  • 4 eggs
  • 2 dl sugar
  • 2 1/2 dl wheat flour
  • 1 teaspoon baking powder
  1. Preheat the oven to 435°F
  2. Melt the butter and chocolate and let cool down a bit.
  3. Whisk eggs and sugar fluffy and light. Mix the flour and baking powder in another bowl.
  4. Pour in the butter and chocolate mix into the eggs and sugar.
  5. Add the flour mixture and mix until just combined.
  6. Pour the batter into a round cake pan and bake in the oven for about 12-15 minutes. The cake will be sticky in the middle but it will set when it cools down.
  7. Put it in the fridge when it has cooled a bit.

Vanilla Rolls

I’ve seen many recipes of vanilla rolls lately, and I get kind of sad because they’re not to be compared to with real vanilla rolls. I’m swedish but I live in Norway so I’ve grown up with these amazing pastries. And if you didn’t know, vanilla rolls and cinnamon rolls are originally from Sweden.

Every time I make vanilla rolls our house fills with this amazing smell and my whole body relaxes. And when I take the first bite I forget, just for a minute, all the bad and stressful things in life. They are crunchy on the outside and really soft inside, filled with a sweet flavour of vanilla, sugar and butter. I remember the warm summers when I was little, eating warm vanilla rolls and drinking rasperry juice. Oh, I’m alomst getting sentimental here…!

Here is the recipe for real swedish vanilla rolls, so please try this recipe next time! It makes 24 rolls.

The dough:

  • 150 grams butter
  • 5 dl milk
  • 50 grams yeast (I use fresh yeast, but you can use dry as well)
  • 1/2 teaspoon salt
  • 1 dl sugar
  • 1 teaspoon cardamom
  • 13 dl wheat flour

The filling:

  • 100 grams buttet at roomtemperature
  • 6 tablespoons  sugar
  • 3 tablespoons vanilla sugar (use the good stuff)
  • 1 egg and pearl sugar
  1. Melt the butter in a sauce pan and add the milk.
  2. Put the yeast in a bowl and pour some of the liquid to dissolve the yeast. Pour the rest of the liquid, salt, sugar and cardamom  in the bowl.
  3. Work the flour into the mix until the dough is smooth. Let rest for 40 minutes.
  4. Transfer the dough to a clean table and spread some of the flour so the dough won’t stick. Divide the dough into two pieces, and roll each piece until thin and rectangle.
  5. Mix butter, sugar and vanilla sugar. Divide this mixture into two, and spread out to each of the doughs.
  6. Roll the dough so it looks like a roll cake and cut 12 equal pieces. Do this to both the doughs so it becomes 24 pieces.
  7. Put them on a baking sheet with some space between each other so they won’t stick together. Let rest for 45 minutes.
  8. Preheat the oven to 250°C
  9. Brush the rolls with the egg and sprinkle with the pearl sugar.
  10. Put in the oven for 8-10 minutes.


American Pancakes

I’ve tried so many different american pancakes recipes in my life, but I never really found the one. Until now. Many times I tried a recipe the pancakes never seemed to “puff up” the way I wanted (haha, you should know that I am not easy to impress when it comes to food by now!). Also, I’ve tried many recipes that claim to be healthier than regular pancakes because they contain whole wheat flour, oatmeal, cottage cheese and blah blah blah. But I’ve experienced that if I want to eat a good classic american pancake, I can’t cheat.

I actually found this recipe in a sweedish cookbook and it’s called Sommarens söta or translated to english The sweet summer-ish. At first when I read the recipe I thought it would be a bit unnecessary to whisk the egg whites to stiff peaks, but I understood that that was the reason the pancakes were so fluffy and soft.

Here is the recipe and it makes 8 big pancakes:

  • 3 1/2 dl wheat flour
  • 2 tablespoons sugar
  • 1 tablespoon baking powder
  • 1/2 teaspoon bicarbonate
  • 1/2 teaspoon vanilla sugar
  •  1 pinch of salt
  • 3 1/2 dl sour milk (please google it since it’s a scandinavian thing so I don’t know what could replace it. Mix sour cream and milk?)
  • 1/2 dl vegetable oil
  • 1 egg yolk
  • 1 egg white
  • Butter
  1. Mix the sour milk, oil and egg yolk to a smooth mixture.
  2. Pour in the dry ingredients to the liquid.
  3. Whisk the egg white until it has stiff peaks and gently fold into the batter.
  4. Preheat a frying pan and use some butter so the pancakes won’t stick to the pan.
  5. And start to fry your pancakes!
  6. Serve with fresh berries, butter, syrup, jam or whatever your heart desire!

Blueberry Muffin

If you didn’t know, 17th of May is a big date here in Norway. It is the National Day and it’s a day for celebration. Anywho, I’m going to a breakfast party with some friends and we were asked to bring some food, so I decided to bring blueberry muffins. Now this isn’t “only” a blueberry muffin, it’s the best of the best. I gave four of them to my friend when she had her birthday and she ate them all up!

I am not easy to impress when it comes to berry muffins. I want the consistency to be very soft, yet something to chew. Also I want the taste of the actual muffin not to taste too sweet and a hint of freshness. The flavour from the berry should be noticeable but not too powerful. Do you agree? Then this muffin is for you!

This recipe makes 12 muffins

– 100 grams of butter at room temperature

– 200 grams of sugar

– 2 eggs

– 2 dl cream fraiche

– 250 grams of wheat flour

– 125 grams of blueberries, frozen or fresh

  1. Preheat your oven to 350 f
  2. Whisk together the butter and sugar
  3. Whisk in your eggs, one by one, and then the creme fraiche
  4. Mix the dry ingredients together and pour into the batter. Stir together until just combined.
  5. Pour in the berries, very carefully so you don’t break them
  6. Fill the batter into muffin cups
  7. Let them bake in the oven for about 20 minutes, or until you can stick a toothpick in the middle and it comes out clear
  8. Let them cool down a bit before you eat!